")
When I first started using the Snipping Tool, I realized something funny: almost nobody uses it properly. Most people press Print Screen, paste into Paint, struggle to crop, or install third-party screenshot software that slows the computer down or adds junk they don’t actually need. I’d say 99% of users don’t realize the Snipping Tool already does everything they’re looking for: cropping, highlighting, arrows, saving, copying, even sharing without any extra downloads.
That’s why I put this guide together. The Snipping Tool is a basic Windows app for taking screenshots, but it becomes incredibly useful once you know how to capture only the part you want, add markup, and share it cleanly. Mac users have similar built-in tools, so they aren’t left out either. In the sections below, I’ve walked through everything a complete beginner would need to know, without assuming any technical background or shortcut knowledge. This way, you don’t have to waste time installing random software just to grab a simple screenshot.
Key takeaways:
- Makes screenshots easy and precise
- Lets you crop only the part you want
- Works on all modern Windows computers (Mac has an equivalent tool)
- Saves directly to your files or clipboard
- Useful for emails, homework, troubleshooting, work tasks, and sharing info online
What is a Snipping Tool?
Snipping Tool is a built-in Windows app that lets you capture screenshots using your mouse. It gives you control over what part of the screen you want to save instead of grabbing everything at once.
The older Print Screen key takes a full screenshot and expects you to paste it somewhere else to crop or edit. Snipping Tool skips that step. You choose the area first, take the shot, and save it immediately.
In short:
- Print Screen = entire screen
- Snipping Tool = only the section you need
This makes it quicker and more convenient for everyday tasks like sharing instructions, saving receipts, sending errors to IT support, or keeping a record of something online.
Why Do People Use the Snipping Tool?

Most people use the Snipping Tool to quickly capture something important that’s on their screen without saving the entire screen. It keeps things clean and focused, which is useful when you only need a small portion of information.
Here are common situations where it helps:
- Saving a payment receipt or invoice
- Sending an error message to support
- Capturing instructions or steps from a website
- Sharing part of a document in chat or email
- Keeping a copy of online forms before submitting
In simple terms, it solves the “I only need this part” problem. Instead of taking a full screenshot and cropping later, the Snipping Tool lets you capture just what matters in one go.
Snipping Tool vs Print Screen (Clear Comparison for Beginners)
| Feature | Snipping Tool | Print Screen Key |
| What it captures | Selected area only | Entire screen |
| How it works | Click + drag with mouse | Press one keyboard button |
| Editing options | Highlight, draw, erase | None (must edit elsewhere) |
| Saving | Save or copy instantly | Must paste into another app |
| Best for | Receipts, documents, chat, errors | Full-screen screenshots |
| Skill level | Very beginner-friendly | Easy but less flexible |
Print Screen is quick if you want everything on the screen, but it doesn’t let you crop or edit at the moment you capture. The Snipping Tool gives you more control because you can drag to select only the important part, then save or highlight it right away. For most everyday tasks, the Snipping Tool is simpler and cleaner.
How to Open the Snipping Tool on Windows
There are a few easy ways to open the Snipping Tool. Use whichever feels most natural to you:
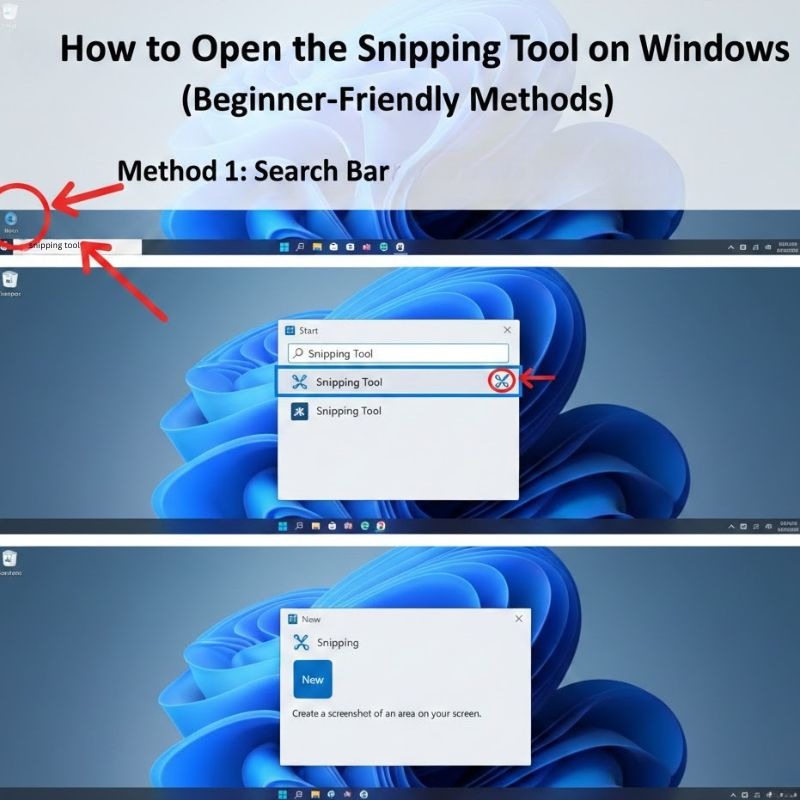
Method 1: Search Bar (Easiest for Beginners)
- Click the Start button or press the Windows key
- Type Snipping Tool
- Click on the app to open it
Method 2: Shortcut Keys (Fastest Method)
Press Windows + Shift + S together
This opens the screenshot bar instantly and lets you snip right away
Method 3: Start Menu
- Click the Start button
- Scroll through the apps list
- Find and click Snipping Tool
All three methods work the same. The shortcut (Windows + Shift + S) is the fastest once you get used to it.
How to Take a Screenshot (Step-by-Step Guide)
Here’s the simplest way to take a screenshot using the Snipping Tool:
Step 1: Open the Snipping Tool
Use either the search bar or the shortcut (Windows + Shift + S).
Step 2: Choose a Snip Mode
Pick rectangular, free-form, window, or fullscreen depending on what you need.
Step 3: Select the Area
Drag your mouse around the part of the screen you want to capture (or click once if using Window Snip).
Step 4: Preview Appears Automatically
After you snip, a small preview pops up in the corner. Click it to open editing options.
Step 5: Save or Copy
From the top bar, click Save to store it as an image, or use Copy to paste it into emails, chats, or documents.
This removes a lot of the fiddling that older screenshot methods required. Most beginners get comfortable after doing it once or twice.
How to Save, Copy, and Share Your Screenshot
After you take a snip, the part that confuses beginners the most is what to do with it next. The Snipping Tool keeps things simple:
Saving the Screenshot (Permanent Copy)
- Click the Save icon (looks like a floppy disk)
- Choose where you want to store the file
- Pick a format like PNG or JPG (PNG keeps text sharp)
Saving is useful when you want to keep the image for future use, attach it to reports, or upload it somewhere.
Copying the Screenshot (Quick Sharing)
- Click the Copy button
- Paste directly into chat, WhatsApp Web, email, Word, or Notes
Copy is faster when you just want to show something to someone without saving a file.
Sharing the Screenshot
On some versions, there’s a Share button that lets you send the screenshot to apps like Email, Teams, or OneNote with one click.
Beginners often get stuck wondering, “Where did the screenshot go?”
The answer is: if you Save, it lives in your folder. If you Copy, it stays in your clipboard until you paste it.
Marking, Highlighting & Explaining with Snipping Tool (What You Can Actually Do)
Taking a screenshot is only half the job. The Snipping Tool becomes extremely useful when you need to explain something to another person. That could be a coworker, a client, your IT support, or even just a friend online.
 Look at the example in the screenshot above – multiple things were done inside Snipping Tool without using any external software:
✔ Cropped the important section – only the stats were captured, not the entire webpage.
✔ Circled key areas – draws attention to the Authority Score.
✔ Added an arrow – points directly at the Backlinks number.
✔ Used colors – makes each highlighted part stand out visually.
✔ Added an emoji – shows reaction or emphasis in a fun, human way.
✔ Outlined content – keeps the viewer focused on the main numbers.
These simple tools help you explain information quickly without writing long paragraphs. They’re especially handy for:
- Work presentations
- Sharing analytics or metrics
- Highlighting bugs or errors
- Sending instructions or demos
- Reporting screenshots to support teams
- School or project work
- Content creation and social media posts
For non-tech users, this is the easiest way to communicate visually. Instead of saying “Look at the third number on the top left,” you just circle it.
Snipping Tool can’t replace full graphic editors, but for everyday explanations, it’s more than enough – and it saves time.
Keyboard Shortcuts for Screenshots (Beginner Cheat-Sheet)
You don’t always have to open the Snipping Tool manually. Windows has a few simple shortcuts that make screenshotting much faster. These are especially useful once you start using screenshots regularly.
Windows Shortcut for Snipping Tool (Most Useful)
- Windows + Shift + S
Opens the snipping bar instantly so you can drag and capture.
Full Screen Screenshot Shortcut
- Print Screen (PrtScn)
Takes a screenshot of the whole screen. You then paste it into Paint, Word, or chat apps.
Copy Screenshot Directly to Clipboard
- Alt + Print Screen
Captures only the active window instead of the whole screen.
Save Full Screenshot Automatically
- Windows + Print Screen
Saves the entire screen as a file in your Pictures → Screenshots folder.
Beginners often don’t know these shortcuts exist, and once they learn them, they stop reaching for the mouse every single time. For fast work, Windows + Shift + S is the one shortcut worth memorizing.
Mac Equivalent: How to Take Screenshots on a Mac (For Mac Users Searching the Same Thing)
Mac doesn’t have an app called “Snipping Tool,” but it has built-in screenshot shortcuts that do almost the same job. The idea is the same: pick an area, capture it, and then save or share it.
Here are the main Mac shortcuts beginners use:
Capture a Selected Area (Closest to Snipping Tool)
- Shift + Command + 4
Your cursor turns into a crosshair so you can drag and select any part of the screen.
Capture the Whole Screen
- Shift + Command + 3
Saves the entire screen as an image instantly.
Screenshot Menu (All Options in One Place)
- Shift + Command + 5
Opens tools for: - Select area
- Record screen
- Choose save location
- Timer options
Where Mac Saves Screenshots
By default, Mac saves screenshots to the desktop with names like Screenshot 2026-01-12.png. That makes them easy to find for beginners.
Markup Tools on Mac
After capturing, Mac also gives editing tools to:
- Draw
- Highlight
- Add text
- Add shapes
- Sign documents
All of this happens without needing extra software.
So even though the name is different, Mac users can do the same tasks Windows users do with Snipping Tool, plus screen recording, which is a bonus.
Just like how screenshots remove clutter from what you want to save, you can also remove clutter from Google results. If you don’t like the new AI Overview showing up on top, here’s how to turn it off.
Common Problems Beginners Run Into and How to Fix Them Fast
Even though the Snipping Tool is simple, a few things often confuse new users. Here are the most common issues and what they usually mean:
“My screenshot didn’t save”
Most of the time, it wasn’t saved, it was only copied.
Fix: click Save after taking the snip, or use Windows + Print Screen to auto-save.
“Where did my screenshot go?”
If you copied it, it’s sitting in your clipboard waiting to be pasted.
Fix: press Ctrl + V in email, chat, WhatsApp Web, Word, or Notes to paste it.
If you auto-saved, check: Pictures → Screenshots.
“The screen went gray and nothing happened”
This usually means the snip was taken but not clicked on.
Look for a small thumbnail preview in the corner and click it to open.
“Snipping tool won’t open”
On older Windows versions, it may be disabled after updates.
Fix: restart, search for Snip & Sketch, or use Windows + Shift + S.
“I can’t snip certain screens”
Some apps (like secure login windows) block screen capture.
There’s no real fix because Windows blocks it by design.
“The shortcut stopped working”
This happens if another app overrides keyboard shortcuts.
Fix: retry after closing apps like screenshot extensions or overlays.
Most of these problems have simple explanations. Once beginners understand the “Save vs Copy” difference and where screenshots get stored, 90% of the confusion disappears.
Useful Tips to Make Screenshots Faster and Cleaner
Once you get comfortable with the basics, a few small tricks can save a lot of time and make your screenshots look better:
Use the Clipboard for Quick Sharing
If you only need to show someone something once, don’t bother saving a file.
Just copy the snip and paste it directly into chat or email.
Use Rectangular Snip for 90% of Situations
Most screenshots are cleaner when cropped into a simple rectangle.
It removes distractions and makes the image easier to understand.
Use Mark-Up for Clarity (Not Decoration)
Circles, arrows, and highlights make it obvious what you’re talking about, helpful for work, tutorials, and support.
Crop Out Personal Information
When sharing receipts, addresses, transaction IDs, or private messages, crop before you send.
Paste Into Docs Instead of Saving
For school or office work, paste the screenshot straight into Word, Google Docs, or PowerPoint, it keeps everything in one place.
Auto-Save Full Screen Shots
If you take a lot of full-screen screenshots, Windows + Print Screen puts them directly in the Screenshots folder, no extra steps.
These tiny habits make the Snipping Tool feel less like a basic utility and more like a proper workflow tool especially once you start using it every day.
If you liked this beginner-friendly format, I’ve written similar guides for other tricky online tasks for example canceling YouTube TV and knowing what happens to your account afterward.
Guide: How to Cancel YouTube TV (Step-by-Step + What Happens After)
Alternatives to Snipping Tool If You Need More Features
The Snipping Tool is perfect for quick, everyday screenshots. But if you need advanced options like scrolling screenshots, annotations with text boxes, cloud sharing, or video screen recording, there are other tools worth knowing about.
Here are a few examples:
- Windows Game Bar (Built-In)
- Shortcut: Windows + G
- Good for capturing gameplay and screen recordings
- ShareX (Free)
- Powerful and customizable
- Can upload screenshots directly to cloud storage
- Supports scrolling web pages
Link: https://getsharex.com/
- Greenshot (Free)
- Simple interface, similar to Snipping Tool
- Adds text boxes and blur features
- Popular for office work
Link: https://getgreenshot.org/
- Snagit (Paid)
- Full editing suite
- Scrolling captures for long web pages and chats
- Best for tutorials and documentation
Link: https://www.techsmith.com/snagit/
Browser Extensions
- For capturing full webpages without scrolling
- Works in Chrome, Edge, or Firefox
- Examples: GoFullPage, Awesome Screenshot
These aren’t required for beginners, but it’s good to know they exist. If you start using screenshots for work, tutorials, or content creation, you may outgrow the basic Snipping Tool eventually.
Frequently Asked Questions
How do I screenshot on a PC?
The fastest method is Windows + Shift + S. Drag to select the area, then save or copy it.
How do I take a screenshot without the whole screen?
Use the Snipping Tool’s rectangular mode. It lets you capture only what you need.
How do I do Print Screen?
Press the Print Screen (PrtScn) key to capture your full screen, then paste it into Paint, Word, or chat.
Where do screenshots get saved on Windows?
Auto-saved full screenshots go to Pictures → Screenshots.
Snipping Tool screenshots need to be saved manually unless you copy and paste.
How do I take a screenshot on a Mac?
Use Shift + Command + 4 to select an area or Shift + Command + 3 for the full screen.
Can I edit or mark up my screenshot?
Yes. You can highlight, draw, circle areas, add arrows, and crop directly inside the Snipping Tool.
Can I screenshot long web pages?
Not with a Snipping Tool. You need a browser extension or a tool like ShareX or Snagit for scrolling screenshots.
Can I record my screen with the Snipping Tool?
Older versions couldn’t, but newer Windows builds allow basic screen recording. Mac also has screen recording built into Shift + Command + 5.