
Many creators and businesses struggle to post consistently on Instagram. Some forget to post on time, while others get too busy with work and skip posting for days. Over time, this inconsistency can affect engagement, reach, and audience growth.
Posting manually every single day also becomes tiring very quickly. You need to open Instagram, upload the content, write the caption, add hashtags, and publish everything at the right time. Doing this repeatedly can take up a lot of time and energy, especially if you are managing multiple posts every week.
This is where Instagram scheduling becomes useful.
Scheduling Instagram posts allows you to prepare your content in advance and publish it automatically at a specific time. Instead of rushing every day, you can plan your content properly and stay consistent without extra stress.
There are several benefits to scheduling Instagram posts:
- It helps you post consistently even during busy days.
- It allows you to publish content when your audience is most active.
- It improves productivity because you can batch-create content in one sitting.
- It reduces burnout by removing the pressure of daily manual posting.
The good news is that Instagram now offers built-in scheduling features, and there are also many tools that make the process even easier.
Also many creators are curious about whether they can see who shared their Instagram posts and how post sharing affects reach and visibility.
In this guide, you will learn how to schedule Instagram posts step by step using the Instagram app, Meta Business Suite, and popular scheduling tools. You will also learn best practices, common mistakes to avoid, and tips that can help you manage your Instagram content more efficiently.
Table of Contents
Can You Schedule Instagram Posts?
Yes, Instagram allows users to schedule posts in advance. This feature is available through Instagram’s built-in scheduling system as well as external scheduling tools.
If you regularly post content on Instagram, scheduling can save a lot of time and make content management much easier. Instead of posting manually every day, you can prepare your content earlier and let Instagram publish it automatically at your chosen time.
However, there are a few important things you should know before using this feature.
Instagram’s Native Scheduling Feature
Instagram now offers native post scheduling for professional accounts. This means you can schedule content directly from the Instagram app without using third-party software.
To access scheduling features, your account must be switched to either a Creator account or a Business account.
Also read: The Complete Guide to Deactivating or Deleting Instagram
Creator vs Business Accounts
Both Creator and Business accounts support scheduling features, but they are designed for slightly different users.
A Creator account is usually better for:
- Influencers
- Personal brands
- Public figures
- Content creators
A Business account is better suited for:
- Companies
- Local businesses
- Ecommerce stores
- Agencies
In terms of scheduling, both account types offer very similar functionality. Most users can use either option without major limitations.
Supported Content Formats
Instagram currently supports scheduling for several content types.
You can schedule:
- Feed posts
- Reels
- Carousel posts
- Stories
This makes it possible to plan most of your Instagram content ahead of time.
For example, you can schedule:
- Educational carousels
- Promotional posts
- Product reels
- Daily story updates
Many creators now batch-create content for an entire week or month and schedule everything in advance.
Scheduling Limits
Instagram also has a few scheduling limits that beginners should know about.
In most cases:
- Posts can be scheduled up to 75 days in advance
- Scheduling requires a professional account
- Some advanced features may still require manual posting
These limits can change over time as Instagram updates its platform.
What You Can and Cannot Schedule
Even though Instagram scheduling has improved a lot, not every feature works perfectly with automation.
Some content types are fully supported, while others still have restrictions.
Supported Content
Most standard Instagram content can now be scheduled without any issues.
This includes:
- Regular feed posts
- Reels
- Carousel posts
- Stories
If your content uses standard captions, images, or videos, scheduling is usually very smooth.
Limited or Restricted Features
Some Instagram features still have limitations when scheduling.
Some Trending Audios
Certain trending or licensed audio tracks may not work properly with scheduled reels. In some cases, the reel may require manual publishing from the Instagram app.
This usually happens because of music licensing restrictions.
Also read: Instagram Subscriptions: Features, Benefits And Requirements
Certain Story Stickers
Some interactive story elements may not function correctly when scheduled.
Examples include:
- Countdown stickers
- Quiz stickers
- Poll stickers
Depending on the scheduling tool you use, these features may require manual editing before publishing.
Collaborative Posts
Instagram Collab posts can also be inconsistent with scheduling tools.
Sometimes the collaboration request must be approved manually after the post goes live. In other cases, the scheduling tool may not fully support the feature at all.
If collaboration posts are important for your strategy, it is a good idea to test the workflow before relying on automation completely.
Requirements Before You Can Schedule Instagram Posts
Before you can start scheduling Instagram posts, there are a few basic requirements you need to complete. Without these settings, the scheduling feature may not appear inside the Instagram app or scheduling tools.
The setup process only takes a few minutes, and once it is done, you can start planning and scheduling content more efficiently.
Switch to a Professional Account
Instagram scheduling is only available for Professional accounts. Personal accounts do not have access to native scheduling features.
To enable scheduling, you need to switch your account to either:
- A Creator account
- A Business account
You can change this inside your Instagram settings at any time.
Creator Account
A Creator account is designed mainly for:
- Influencers
- Creators
- Public figures
- Personal brands
This option works well if you mainly create content, build an audience, or grow a personal brand on Instagram.
Creator accounts also provide access to:
- Audience insights
- Content analytics
- Scheduling tools
- Monetization features in some regions
Business Account
A Business account is more suitable for:
- Brands
- Local businesses
- Ecommerce stores
- Agencies
This type of account includes additional business-focused features such as:
- Advertising tools
- Contact buttons
- Business analytics
- Integrations with marketing tools
If you sell products or manage a company profile, a Business account is usually the better option.
Connect Your Facebook Page (Optional but Recommended)
Connecting your Instagram account to a Facebook Page is not always mandatory, but it is highly recommended.
This becomes especially useful if you plan to use:
- Meta Business Suite
- Advanced scheduling tools
- Cross-platform posting
- Advertising features
Once connected, you can manage both Facebook and Instagram content from one dashboard.
This setup also improves compatibility with many third-party scheduling platforms.
For businesses and creators who want a smoother workflow, connecting a Facebook Page is usually worth doing.
Update the Instagram App
If you do not see scheduling options inside Instagram, the app may be outdated.
Instagram regularly adds new features and improvements through app updates. Older versions may not support native scheduling properly.
Before troubleshooting anything else:
- Update Instagram to the latest version
- Restart the app
- Log in again if necessary
Keeping the app updated also helps avoid bugs and publishing issues when scheduling posts or reels.
How to Schedule Instagram Posts Using the Instagram App
Instagram now allows users to schedule posts directly from the mobile app. This is one of the easiest ways for beginners to plan content in advance without using external tools.
The entire process only takes a few minutes once your account is set up correctly.
Below is a step-by-step guide to scheduling Instagram posts using the official Instagram app.
Step 1: Create Your Post
Start by opening Instagram and tapping the create button, just like you normally would when posting content.
Then:
- Upload your photo, reel, or carousel
- Edit the content if needed
- Tap “Next”
After that, complete the post details carefully.
Add:
- A caption
- Hashtags
- Location tags
- Mentions if required
It is a good idea to finalize everything before scheduling because you may forget small details later.
If you are scheduling multiple posts, keeping captions prepared in advance can save even more time.
Step 2: Open Advanced Settings
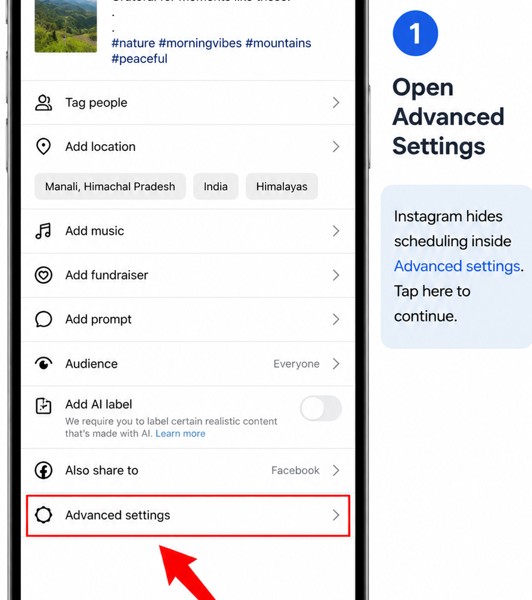
Once your post details are ready, scroll down near the bottom of the publishing screen.
You will see an option called “Advanced settings” option (as in the screenshot above)
Tap on it to open additional publishing options.
Many beginners miss this section because the scheduling feature is not displayed directly on the main posting screen.
Step 3: Choose “Schedule This Post”
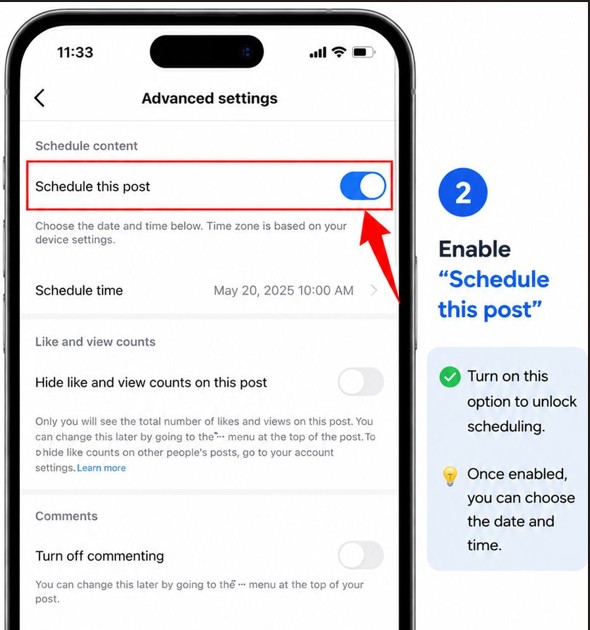
Inside Advanced settings, look for the option called “Schedule this post.”
Turn the toggle on.
Once enabled, Instagram will allow you to choose the exact date and time for publishing your content automatically.
If you do not see this option:
- Check whether you are using a Professional account
- Update the Instagram app
- Restart the app if necessary
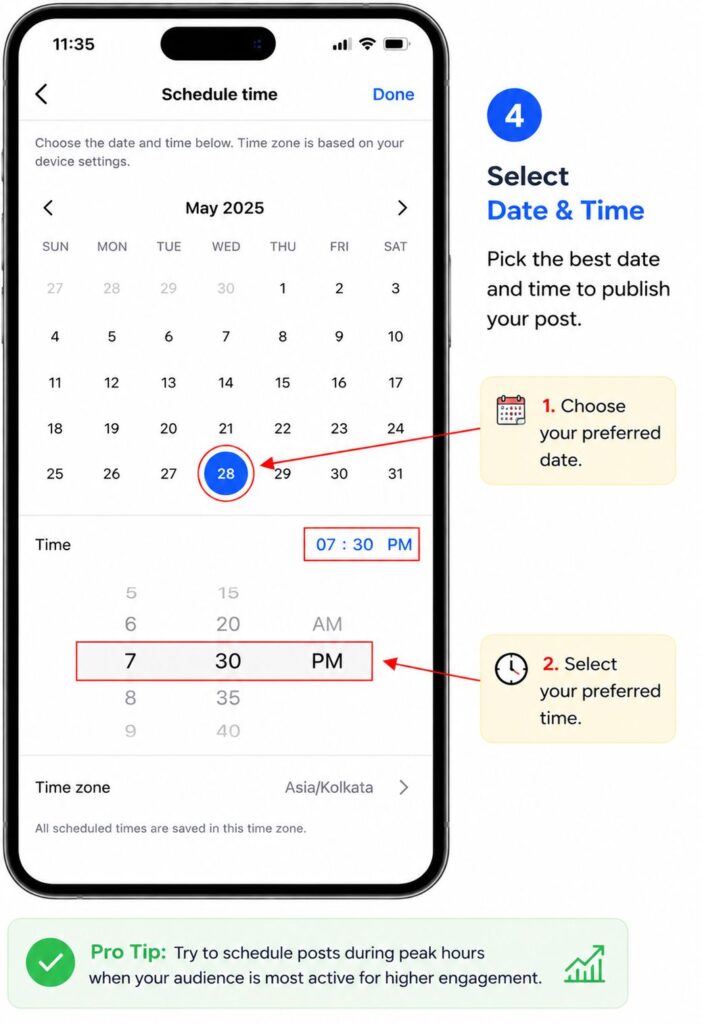
Step 4: Select Date and Time
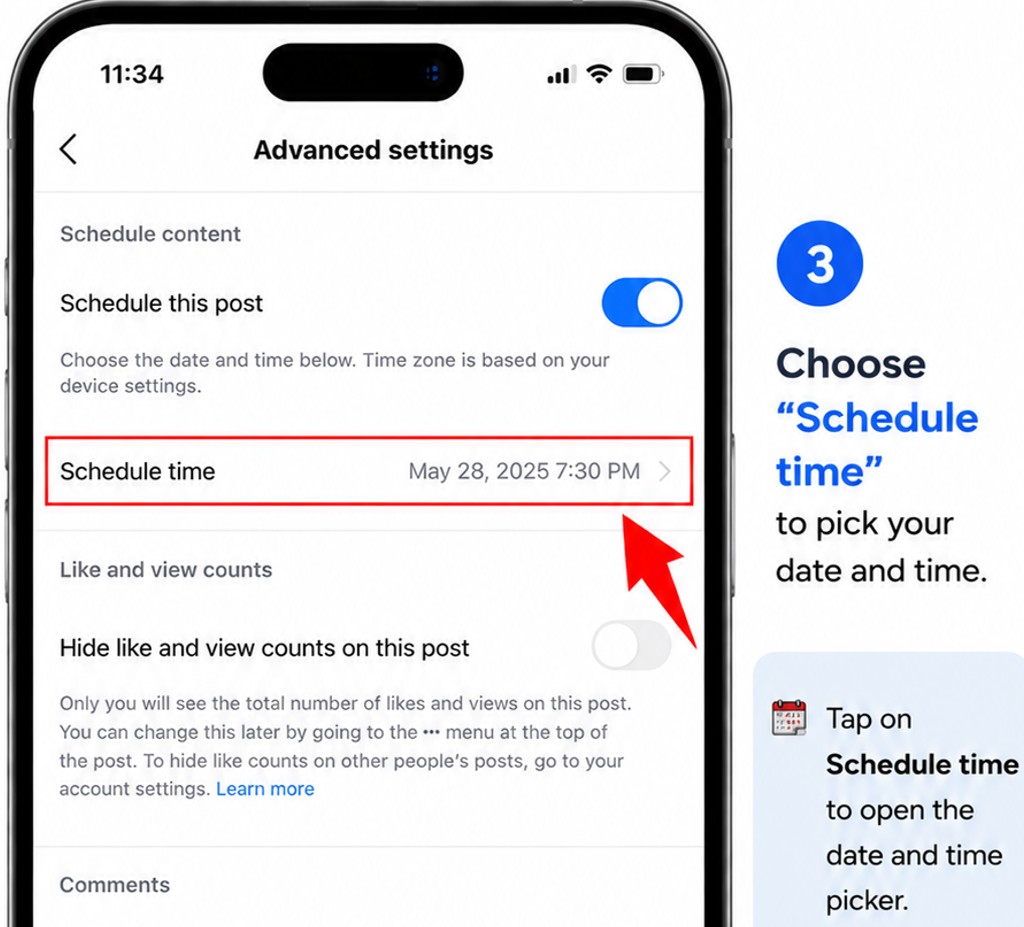
After enabling scheduling, choose:
- Your preferred publishing date
- The exact posting time
Try to schedule content during the hours when your audience is most active.
For many accounts, engagement is usually stronger:
- In the morning
- During lunch hours
- In the evening
However, your audience behavior may vary depending on your niche and location.
Instagram will display the scheduled time clearly before confirmation.
Step 5: Confirm Scheduled Content
After selecting the date and time:
- Return to the previous screen
- Review your post one final time
- Tap “Schedule”
Instagram will now save the content inside your scheduled posts section and publish it automatically at the selected time.
You can usually view scheduled content by:
- Opening your profile
- Accessing professional tools
- Checking scheduled content settings
From there, you can:
- Edit scheduled posts
- Reschedule content
- Delete scheduled posts if needed
How to Schedule Instagram Posts Using Meta Business Suite
Another popular way to schedule Instagram content is by using Meta Business Suite.
This is Meta’s official content management platform for Facebook and Instagram. Many creators, businesses, and agencies use it because it offers more control and flexibility than the Instagram mobile app.
Meta Business Suite works especially well for users who prefer managing content from a desktop computer.
Why Many Creators Prefer Meta Business Suite
Meta Business Suite offers several features that make content scheduling easier and more organized.
One major advantage is the desktop workflow. Writing captions, uploading media, and planning content is often faster on a larger screen compared to using a mobile phone.
Another useful feature is the built-in content calendar. This allows you to see all your scheduled posts in one place, making it easier to plan weekly or monthly content.
Creators also use Meta Business Suite for:
- Bulk scheduling multiple posts
- Tracking analytics and engagement
- Managing both Facebook and Instagram together
- Cross-posting content across platforms
For businesses and creators posting regularly, this tool can make content management much more efficient.
Step-by-Step Tutorial
Below is a simple step-by-step guide for scheduling Instagram posts using Meta Business Suite.
Step 1: Connect Instagram Account
First, open Meta Business Suite in your browser and log in with your Facebook account.
Then:
- Connect your Instagram account
- Link your Facebook Page if required
- Grant the necessary permissions
Once connected successfully, you will be able to manage Instagram content directly from the dashboard.
If your Instagram account does not appear, make sure:
- It is set to a Professional account
- It is linked correctly to your Facebook Page
Step 2: Create Post or Reel
Inside the dashboard, click the “Create Post” or “Create Reel” option.
Then choose:
- or both platforms together
This flexibility is useful if you want to publish the same content across multiple social media platforms.
Step 3: Upload Media
Next, upload your content.
You can upload:
- Images
- Videos
- Reels
- Carousel posts
Meta Business Suite will usually generate a preview so you can see how the post will appear on Instagram before publishing.
Make sure:
- Image quality looks correct
- Video dimensions are optimized
- Thumbnails appear properly
Step 4: Optimize Caption & Hashtags
Now add your caption, hashtags, and other post details.
This is a good time to:
- Improve readability
- Add clear calls to action
- Include relevant hashtags
- Tag accounts if necessary
Since you are working from a desktop interface, editing captions is often faster and more comfortable compared to typing everything on a mobile device.
You can also review spacing and formatting more carefully before scheduling.
Step 5: Schedule the Post
After everything is ready, click the scheduling option instead of publishing immediately.
Then:
- Select your preferred date
- Choose the publishing time
- Confirm the schedule
Meta Business Suite will automatically publish the content at the selected time.
You can later return to the content calendar to:
- Edit scheduled posts
- Reschedule content
- Review upcoming posts
- Track published content
For creators managing content consistently, this workflow can save a significant amount of time every week.